Sooty Tern No. 93

Collapse
X
 
  • Time
  • Show
Clear All
new posts
  • Alex1N
    Senor Membier
    • Mar 2010
    • 552

    Re: Sooty Tern No. 93

    Stem stuff:

    1. 3M blue painter's tape added to apron 'topside' and forward faces


    Extra blue tape added on top by Alexander Newman, on Flickr.


    2. I shifted glueing operations up onto a suitably protected bench top (or part thereof)


    Glueing to be done up off the floor this time by Alexander Newman, on Flickr.


    3. I made up a new 'chisel' scraper from a tongue depressor:


    Tongue depressor ‘chisel’ for glue clean-up by Alexander Newman, on Flickr.


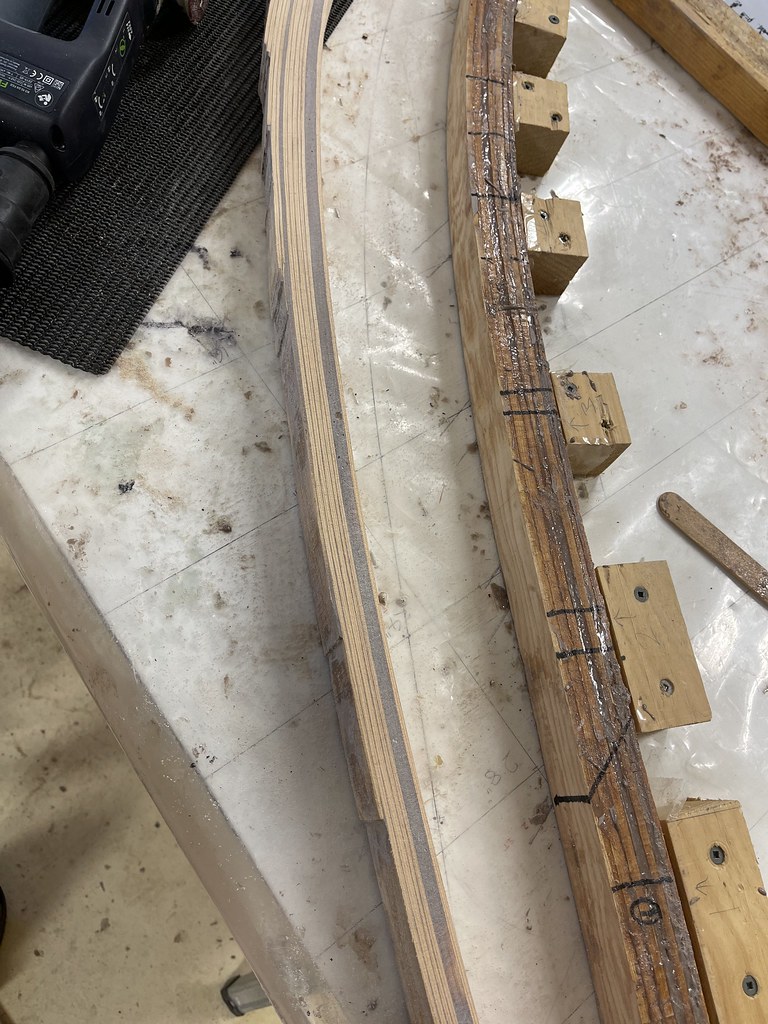
    4. I decided to glue the stem up in three separate stages, letting one stage set fully before cleaning up and adding the next


    First set of outer bow stem laminations - six. Clamps are, in my opinion after their removal, the wrong way round by Alexander Newman, on Flickr.


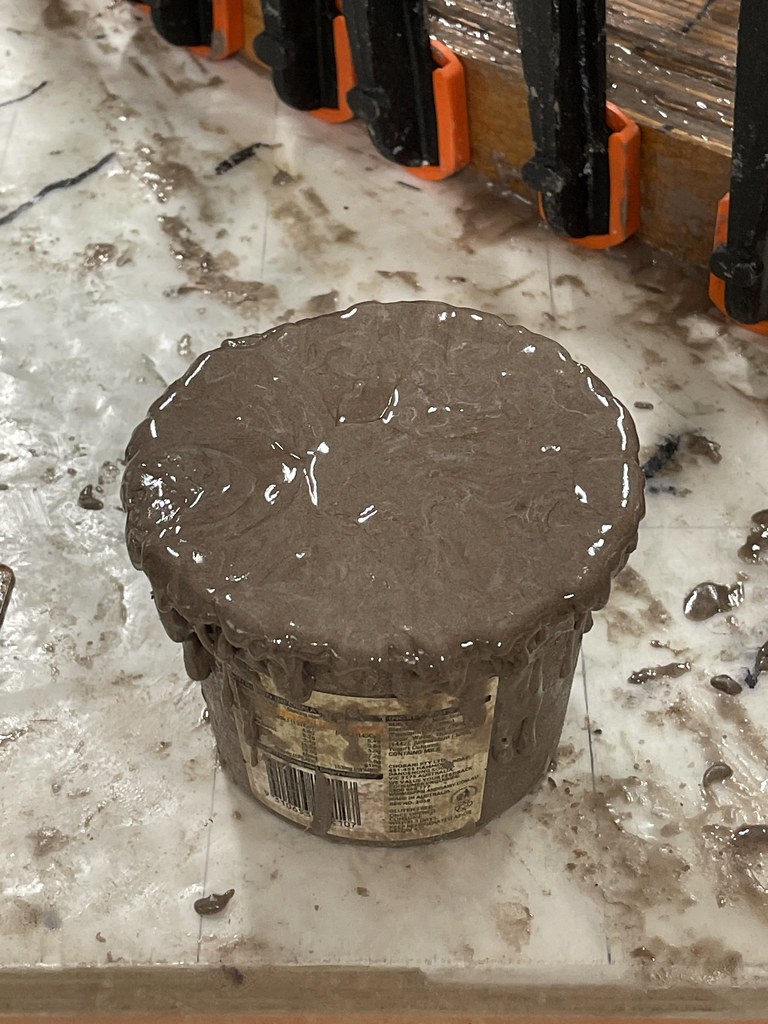
    5. Stage one complete, and the surplus glue pot is filling up fast!


    The whole setup by Alexander Newman, on Flickr.


    6. Top end - so far, so good...


    Top end by Alexander Newman, on Flickr.
    You can never have too many clamps
    —————————————————————————————-
    “…the builder must find a proper place to make a full-sized drawing of the plan marked "lines." It is this stage of building that is so often neglected, and this is the most common cause of trouble later on.” - Howard I. Chappelle, Boatbuilding. Introduction, p.19. My emphasis.

    Comment

    • Alex1N
      Senor Membier
      • Mar 2010
      • 552

      Re: Sooty Tern No. 93

      This build is rapidly becoming highly embarrassing.

      1. Here's the cutoff point 'twixt stages 2 and 3: ten staves in no. 2, nine in no. 3. I am beginning to like Max's pourer lid more and more...


      Two more glueing stages decided on by Alexander Newman, on Flickr.


      2. I decided to get clever and decant nine very slowly returning pumps of resin into ten pots way ahead of time. Worked a treat


      10 pots, 9 pumps of resin each - setting up for next glueing session by Alexander Newman, on Flickr.


      3. Stage two complete, and this is where the wheels really fell off. I didn't do what Mr Zimm suggested above and block the lifting staves back down (largely because of he forest of clamps used on account of the thinness of the staves), and even accounting for the taper in the stem's cross section, there will be a bot of a hole. solution? Fill it with more glue. I am keeping my options open on either redoing the whole stem, or cutting out the couple of raised staves and inserting new ones. I'll make that decision once I've done some proper cleaning up. I have a bit of leeway built in too, since the stave widths are quite a bit more than they needed to be


      Second glueing session complete, except for the cleanup by Alexander Newman, on Flickr.


      4. Glueing of stage 3 - and stem - done. The lifted staves from stage 2 are casting a shadow over stage 3 - in more ways than one. The surplus glue pot is now overflowing


      Glueing of stage 3 complete by Alexander Newman, on Flickr.


      5. Glue everywhere, of course


      Stage 2/3 interface by Alexander Newman, on Flickr.


      6. Top end of the stem


      Top end of completed glue-up by Alexander Newman, on Flickr.


      Barring having to cut and glue a whole new bow stem - or cut the errant staves out, make good and glue new ones in - that's the bits for the front end of the boat glued up. Next step will be some cleaning up, starting with the apron. And the heat gun and scraper...
      You can never have too many clamps
      —————————————————————————————-
      “…the builder must find a proper place to make a full-sized drawing of the plan marked "lines." It is this stage of building that is so often neglected, and this is the most common cause of trouble later on.” - Howard I. Chappelle, Boatbuilding. Introduction, p.19. My emphasis.

      Comment

      • IanMilne
        Senior Member
        • Mar 2015
        • 1074

        Re: Sooty Tern No. 93

        Hi Alex,
        You don't need to use a heat gun and scraper on this. When the glue has set, plane the upper side flat with your electric planer, but no more than you have to. Then use your thickness planer to bring the whole thing down to its finished width. With the extra width you have left on the staves, I think it will come out just fine. The inner stem is going to be shaped down to take the planking anyway, and the outer stem will be shaped down to a tapered cutwater with just the top end left square.
        Cheers,
        Ian
        Old Joke: ‘A bench fitter works to the nearest thousandth of an inch. A loco fitter (steam) works to the nearest inch. A shipwright works to the nearest ship’.”
        Alan Byde, Canoe Design and Construction, Pelham Books, 1978

        “...old maxim, 'A fair line supersedes any given measurement'.”
        Allan H. Vaitses, Lofting, International Marine, 1980

        Comment

        • Andrew Donald
          Senior Member
          • Mar 2019
          • 1032

          Re: Sooty Tern No. 93

          I totally agree with Ian, Alex. Choose the side of stem lamination to rough plane carefully though, the side that needs the least taken off will leave you more on the other side to work with. Don’t worry if you don’t get down to timber on all staves cos you’re going to glue the planks on with goop anyway. Epoxy sticks to itself very well if the keying is rough enough.

          Your main thing to look out for is straightness from one end of stem to the other. Hasten slowly

          P.S. I usually plane one side rough, run it over my jointer to get it straight then run it through the table saw or second the thicknesser.

          A flat sheet of MDF ( ply is not often straight enough) on your building frame will be a good guide for where you need to plane failing no jointer.

          oh. Put every second clamp around the other way so you don’t clash handles.
          Last edited by Andrew Donald; 04-19-2021, 04:09 AM.

          Comment

          • Alex1N
            Senor Membier
            • Mar 2010
            • 552

            Re: Sooty Tern No. 93

            Originally posted by IanMilne
            Hi Alex,
            You don't need to use a heat gun and scraper on this. When the glue has set, plane the upper side flat with your electric planer, but no more than you have to. Then use your thickness planer to bring the whole thing down to its finished width. With the extra width you have left on the staves, I think it will come out just fine. The inner stem is going to be shaped down to take the planking anyway, and the outer stem will be shaped down to a tapered cutwater with just the top end left square.
            Cheers,
            Ian
            Originally posted by Andrew Donald
            I totally agree with Ian, Alex. Choose the side of stem lamination to rough plane carefully though, the side that needs the least taken off will leave you more on the other side to work with. Don’t worry if you don’t get down to timber on all staves cos you’re going to glue the planks on with goop anyway. Epoxy sticks to itself very well if the keying is rough enough.

            Your main thing to look out for is straightness from one end of stem to the other. Hasten slowly

            P.S. I usually plane one side rough, run it over my jointer to get it straight then run it through the table saw or second the thicknesser.

            A flat sheet of MDF ( ply is not often straight enough) on your building frame will be a good guide for where you need to plane failing no jointer.

            oh. Put every second clamp around the other way so you don’t clash handles.
            Thanks you very much for your advice, Ian and Andrew. Jointer sounds good if I can handle the curvy things ok. Some strategically-placed stands will help there, I think. I’ll see about getting some more 3 mm MDF, despite loathing the stuff. Good point about alternating clamp directions - some were quite hard to tighten up.

            You were right about the thinner staves requiring more glue, Ian - see below. A hard-learned lesson, that. I am going back to my original method of setting the stave widths. I measured the staves cut for the apron - mostly 5 and 6 mm, the last one cut was 4 mm.

            A remnant photo of remnant glue...


            Surplus glue... by Alexander Newman, on Flickr.

            Cheers,
            Alex.
            You can never have too many clamps
            —————————————————————————————-
            “…the builder must find a proper place to make a full-sized drawing of the plan marked "lines." It is this stage of building that is so often neglected, and this is the most common cause of trouble later on.” - Howard I. Chappelle, Boatbuilding. Introduction, p.19. My emphasis.

            Comment

            • IanMilne
              Senior Member
              • Mar 2015
              • 1074

              Re: Sooty Tern No. 93

              I don't think you need to buy more 3mm MDF for this purpose, if I may say so. It would be too bendy. The top face of your levelled building frame would do just as well for checking the straightness of your laminated stems, even if it is not a continuous surface. They should be straight anyway, from the laminating bench. Just eyeball along the side of the stem, from one end.
              You get quite good at guessing the amount of glue to mix up, after a while. I use measuring glasses. I'll put a photo of them on here, but not right now.
              Cheers,
              Ian
              Old Joke: ‘A bench fitter works to the nearest thousandth of an inch. A loco fitter (steam) works to the nearest inch. A shipwright works to the nearest ship’.”
              Alan Byde, Canoe Design and Construction, Pelham Books, 1978

              “...old maxim, 'A fair line supersedes any given measurement'.”
              Allan H. Vaitses, Lofting, International Marine, 1980

              Comment

              • Andrew Donald
                Senior Member
                • Mar 2019
                • 1032

                Re: Sooty Tern No. 93

                Must admit my minds eye was thinking/seeing 16mm MDF but yes the top of building frame is def adequate and it saves having another piece of stuff laying about.

                Is that a whole tub full of epoxy in #335 !!! Mix small batches, there’s not usually that much of a hurry once the goop is spread out on staves. It’ll heat itself up and go off quicker in big lots
                Last edited by Andrew Donald; 04-19-2021, 06:14 PM.

                Comment

                • WI-Tom
                  Seaside Expat
                  • Jan 2009
                  • 15929

                  Re: Sooty Tern No. 93

                  Originally posted by Andrew Donald
                  Is that a whole tub full of epoxy in #335 !!! Mix small batches, there’s not usually that much of a hurry once the goop is spread out on staves. It’ll heat itself up and go off quicker in big lots
                  Judging by the clamps for scale, I think it's a fairly small dish--just squeeze-out from the glue job, maybe? You can see the size better in the 4th and 5th photos in post #331.

                  But I know what you mean; from that last picture, I thought I was looking at a 5-gallon pail filled with epoxy for a moment!

                  Tom
                  Ponoszenie konsekwencji!

                  www.tompamperin.com

                  Comment

                  • Max F
                    Senior Member
                    • Nov 2008
                    • 1099

                    Re: Sooty Tern No. 93

                    Mmmmh ja, I wasn´t logged in.
                    So here is the bottle again.
                    Best thing ever to dispense epoxi.
                    No more sticky bottles.

                    Cheers Max

                    P1050587 by capitan Max, on Flickr

                    Comment

                    • Alex1N
                      Senor Membier
                      • Mar 2010
                      • 552

                      Re: Sooty Tern No. 93

                      Originally posted by IanMilne
                      I don't think you need to buy more 3mm MDF for this purpose, if I may say so. It would be too bendy. The top face of your levelled building frame would do just as well for checking the straightness of your laminated stems, even if it is not a continuous surface. They should be straight anyway, from the laminating bench. Just eyeball along the side of the stem, from one end.
                      You get quite good at guessing the amount of glue to mix up, after a while. I use measuring glasses. I'll put a photo of them on here, but not right now.
                      Cheers,
                      Ian
                      Thanks for the advice, Ian. I'm hoping that the rest of the jacks appear midweek courtesy of our friend, and am planning on checking the building frame on Thursday. Or Friday,. Or Saturday...soon-ish, anyway. I wasn't bad at getting mixture sizes right by the end of the 'Duck - but this wee beastie is a different bucket o' snakes entirely!


                      Originally posted by Andrew Donald
                      Must admit my minds eye was thinking/seeing 16mm MDF but yes the top of building frame is def adequate and it saves having another piece of stuff laying about.

                      Is that a whole tub full of epoxy in #335 !!! Mix small batches, there’s not usually that much of a hurry once the goop is spread out on staves. It’ll heat itself up and go off quicker in big lots
                      Ah ha, no, ha ha ha ha! It's scrapings-off of squeezeout over the apron-stem buildup. 730-odd ml (bit over a pint) thereof!


                      Originally posted by WI-Tom
                      Judging by the clamps for scale, I think it's a fairly small dish--just squeeze-out from the glue job, maybe? You can see the size better in the 4th and 5th photos in post #331.

                      But I know what you mean; from that last picture, I thought I was looking at a 5-gallon pail filled with epoxy for a moment!

                      Tom
                      See above! Not 5 gallons o' glue!

                      Originally posted by Max F
                      Mmmmh ja, I wasn´t logged in.
                      So here is the bottle again.
                      Best thing ever to dispense epoxi.
                      No more sticky bottles.

                      Cheers Max
                      That'll do it! Thanks for the picture! The closest thing in the laundry won't come out of the bottle, so I will have to look a bit harder when at the supermarket.

                      1. I got the clamps off the 3rd stage of the stem layup before lunch:


                      Clamps off... by Alexander Newman, on Flickr.


                      2. Glue everywhere, again... Nice fractal sort of pattern though


                      Glue everywhere by Alexander Newman, on Flickr.


                      3. These holes were a bit alarming at first sight


                      Holes not quite as bad as the look - disappeared after belt sanding by Alexander Newman, on Flickr.


                      4. The hand planer did not like being made to cut the glue, so I switched to the belt sander (coarse-ish belt)


                      I had a go at the ‘top’ with the hand planer, which didn’t like it at all by Alexander Newman, on Flickr.


                      5. Holes revisited


                      ‘Holes’ revisited - they will vanish once the thing it brought down square with the inner face by Alexander Newman, on Flickr.


                      6. I have been checking the flatness of the part using the handy straight-edge on the 1200 mm spirit level. It's not too bad except at the top end - where I haven't taken much off yet. I took pity on the sander and my ears (the ear muffs are up at the other workshop)


                      The ‘underside’ after a bit a go with the belt sander by Alexander Newman, on Flickr.

                      I also stopped before I went too far, and did some checkingwith the engineer's square - not too bad for the most part, but room ro improvement - which will come in the for of the jointer (I hope) on the weekend.

                      Cheers,
                      Alex.
                      Last edited by Alex1N; 04-21-2021, 06:44 AM.
                      You can never have too many clamps
                      —————————————————————————————-
                      “…the builder must find a proper place to make a full-sized drawing of the plan marked "lines." It is this stage of building that is so often neglected, and this is the most common cause of trouble later on.” - Howard I. Chappelle, Boatbuilding. Introduction, p.19. My emphasis.

                      Comment

                      • Alex1N
                        Senor Membier
                        • Mar 2010
                        • 552

                        Re: Sooty Tern No. 93

                        1. Here's a more 'normal' view of the stem - vertical, as it will appear in the boat


                        Bow apron and stem by Alexander Newman, on Flickr.


                        2. From the front (almost)


                        Apron and stem again by Alexander Newman, on Flickr.


                        3. I did a bit more material removal from the lumpy side of the stem today - I got out the Rotex - which is hooked up to the vacuum cleaner:


                        Apron and stem again by Alexander Newman, on Flickr.


                        4. It was good not to have dust going everywhere, even after ten minutes of thrashing the sander.Still a bit of a way to go on this side, however...


                        Ten minutes’ worth of grinding with a coarse pad by Alexander Newman, on Flickr.


                        5. Our friend dropped off the bottle jacks today, nearly there with that


                        Bottle jacks ready to go (and a stand) by Alexander Newman, on Flickr.


                        I'm hoping to get up to the workshop tomorrow, but I suspect that other things are going to get in the way. Fingers crossed, though.

                        Cheers,
                        Alex.
                        You can never have too many clamps
                        —————————————————————————————-
                        “…the builder must find a proper place to make a full-sized drawing of the plan marked "lines." It is this stage of building that is so often neglected, and this is the most common cause of trouble later on.” - Howard I. Chappelle, Boatbuilding. Introduction, p.19. My emphasis.

                        Comment

                        • Alex1N
                          Senor Membier
                          • Mar 2010
                          • 552

                          Re: Sooty Tern No. 93

                          Today got tied up with orchestral library duties plus domestic shopping. As I had to go a bit further up the Mountains to drop off some music, by the time that I got to the workshop there wasn't any opportunity other than to offload some stuff.

                          1. A brief fifteen minutes allowed be to pop the borrowed jacks under the frame - alternating scissors with bottles


                          Four jacks on one side by Alexander Newman, on Flickr.


                          2. I bought a fourth scissor jack this morning, see if you can spot it, ha ha...


                          Four jacks on the other by Alexander Newman, on Flickr.


                          3. I managed to squeeze in about half an hour of sanding on the stem. Once I noticed some wobbles I stopped for the day


                          Overview of glue removal on the ‘bottom’ (port) side by Alexander Newman, on Flickr.


                          4. I'm getting things almost to the stage of running through the thicknesser and/or jointer...


                          More sanding by Alexander Newman, on Flickr.


                          5. A way to go yet on the port side though


                          Still a way to go on this side by Alexander Newman, on Flickr.


                          6. The starboard side is looking a bit better (but has a few dips which I have since marked


                          Got a bit further with this end by Alexander Newman, on Flickr.

                          I'm having a bit of a rest from the sanding for a bit while I work out the best was to proceed - planer, belt sander, thicknesser of jointer, or a combination of the above. The dips worried me a bit - while not excessive, I need to be more careful and switch from the small rotary sander, I think. I can get on with the building frame, in any case, which is probably more important at the moment.
                          You can never have too many clamps
                          —————————————————————————————-
                          “…the builder must find a proper place to make a full-sized drawing of the plan marked "lines." It is this stage of building that is so often neglected, and this is the most common cause of trouble later on.” - Howard I. Chappelle, Boatbuilding. Introduction, p.19. My emphasis.

                          Comment

                          • John Meachen
                            Senior Member
                            • Jan 2004
                            • 10505

                            Re: Sooty Tern No. 93

                            I'm a little confused by the jacks,are they used so that you can cut solid props to match the height to which the frame has been adjusted?

                            Comment

                            • Alex1N
                              Senor Membier
                              • Mar 2010
                              • 552

                              Re: Sooty Tern No. 93

                              Originally posted by John Meachen
                              I'm a little confused by the jacks,are they used so that you can cut solid props to match the height to which the frame has been adjusted?
                              Hello John, you have got it exactly right - the jacks are temporary supports while I get the thing levelled, and will be removed after all ten legs are fastened in place. The legs were previously cut to length, before I got some very useful advice from Andrew Donald.

                              1. Success! and it was extremely quick!


                              Levelled! It only took five minutes! by Alexander Newman, on Flickr.


                              2.
                              Very simple, very quick! by Alexander Newman, on Flickr.


                              3. The reference corner was at the known high point (port bow)


                              Reference corner (high point, at port bow) by Alexander Newman, on Flickr.


                              4. You can see that the starboard bow corner has had to be cranked up a bit


                              Starboard bow corner - raised a bit by Alexander Newman, on Flickr.


                              5. Starboard stern corner up a bit, but not as much as up at the bow


                              Starboard stern corner leg attached - frame also quite a bit higher here by Alexander Newman, on Flickr.


                              6. Port stern corner up a bit too


                              Port stern corner by Alexander Newman, on Flickr.

                              TBC...
                              You can never have too many clamps
                              —————————————————————————————-
                              “…the builder must find a proper place to make a full-sized drawing of the plan marked "lines." It is this stage of building that is so often neglected, and this is the most common cause of trouble later on.” - Howard I. Chappelle, Boatbuilding. Introduction, p.19. My emphasis.

                              Comment

                              • Alex1N
                                Senor Membier
                                • Mar 2010
                                • 552

                                Re: Sooty Tern No. 93

                                1. Port stern leg in place - and all the bits and pieces used. Not the (now rather short) piece of chalk, used to mark around the legs so that I can tell if the frame has moved at all


                                Port stern leg fixed by Alexander Newman, on Flickr.


                                2. I am indebted to Andrew Donald for suggesting this way of sorting out the frame and legs - look at this gap! That would have been a nightmare to fix with my original idea of chocking up the legs with bits and pieces


                                Starboard midships leg - look at the gap! by Alexander Newman, on Flickr.


                                3. Done! I still can't believe how quick and efficient that all was!


                                All ten legs on and jacks removed. Chalk outlines around to feet by Alexander Newman, on Flickr.


                                4. I marked out the slot for the bow apron in the support beam using a marking knife - I took the measurements of the intersection of the forward perpendicular and the the line showing the top of the building frame from lofting/laminating board at home earlier. The slope of the bow at this point is quite different from that of the Arctic Tern (see photo 6 below)


                                Apron cutout marked - quite different from the Arctic Tern by Alexander Newman, on Flickr.


                                5. Overview of the marked-out bow apron slot in the apron's support beam


                                Overview of the bow apron slot by Alexander Newman, on Flickr.


                                6. In this little snippet from the AT stems plan, you can infer how different the ST's bow rake is when compared with photo 4


                                The Arctic Tern’s bow apron frame-support cutout is very different in shape to that of the Sooty’s by Alexander Newman, on Flickr.

                                TBC...
                                Last edited by Alex1N; 04-23-2021, 05:08 AM.
                                You can never have too many clamps
                                —————————————————————————————-
                                “…the builder must find a proper place to make a full-sized drawing of the plan marked "lines." It is this stage of building that is so often neglected, and this is the most common cause of trouble later on.” - Howard I. Chappelle, Boatbuilding. Introduction, p.19. My emphasis.

                                Comment

                                Working...